Joints in Natural Stone: the Right Joint Width — and What Happens Without It
Tight joints, large slabs, underfloor heating — and a few months later the stone breaks away at the edges. Why natural stone needs joints, how wide they have to be, and where the decisive work happens: before the first cut.
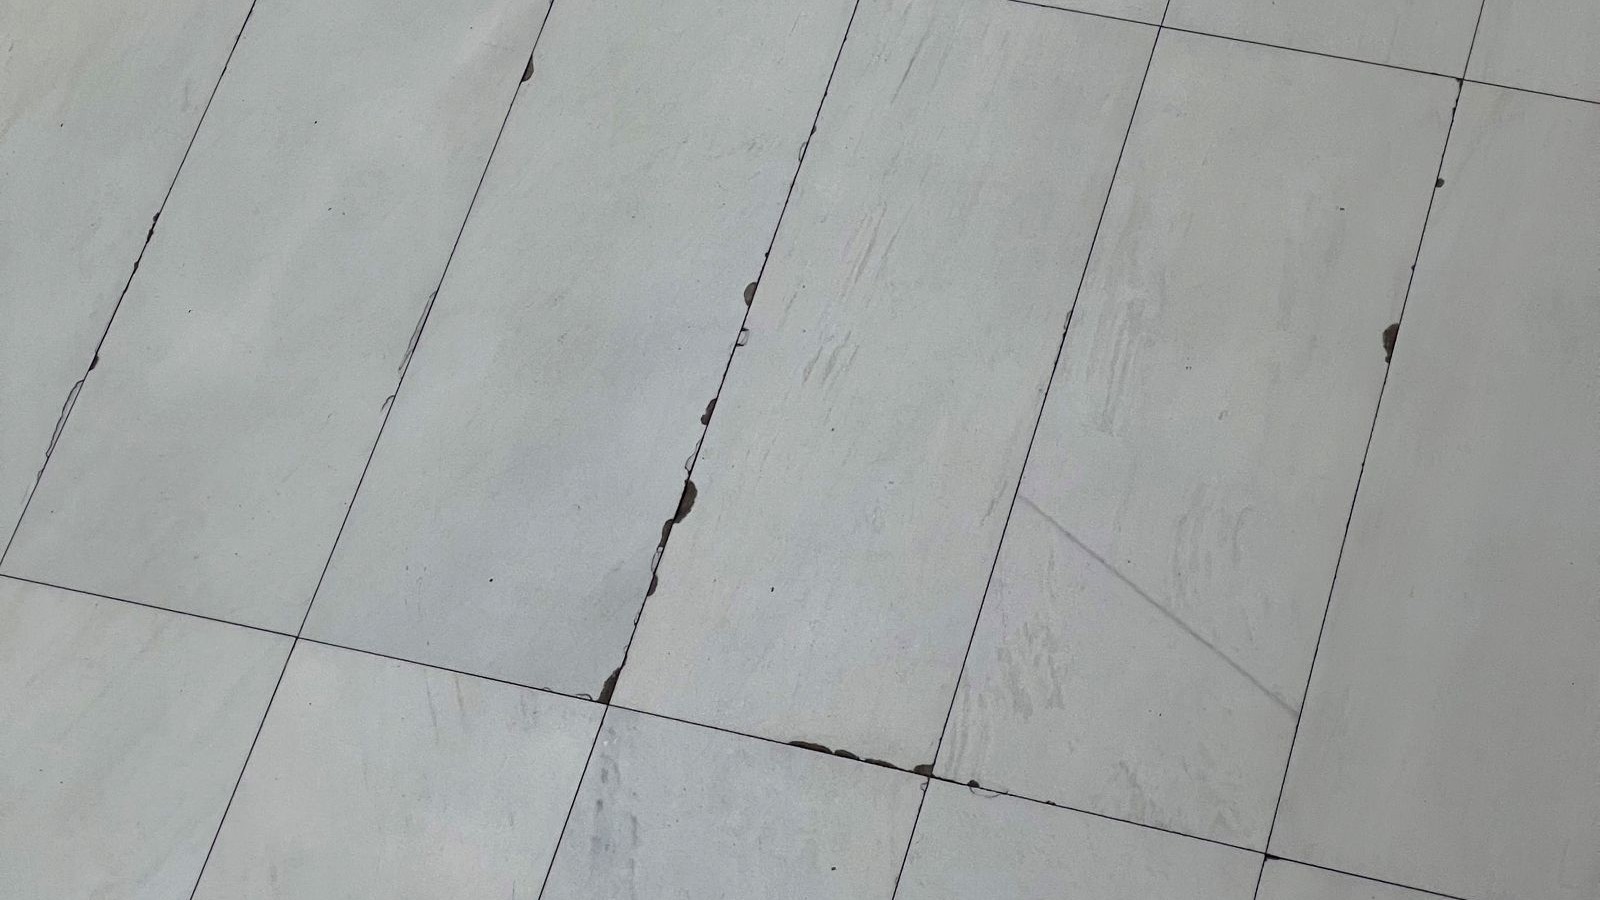
Chipping on a real floor: edges breaking away along the joints on white natural stone, documented during a damage inspection.
I remember a project where we reviewed the drawings and saw it immediately: the requirements for the joint pattern were extremely demanding. Relative to the size of the stone, very tight joints were specified — and the movement joints did not match the grid requirements of the relevant standards.
We raised our concerns. The answer came promptly: "Then perhaps your stone and your engineering are not what we need for this project."
So we held back, followed the project team's specifications, produced and delivered. And as was to be expected, the chipping began a few months later — small pieces breaking away at the edges, along the joints.
The knowledge was there. It was spoken out loud. And still the assumption persists that experience from the last project does not apply to the next one — as if nature could be outwitted. It cannot. These are laws of nature.
Why Natural Stone Needs Joints
There is a desire for the "seamless" floor — a surface that looks as though it were cast in one piece. Technically this is an illusion, for two reasons.
Natural stone moves. Temperature changes make it expand when warm and contract when cold — more on that shortly.
And cutting to the exact millimetre is an illusion too. Dimensioned natural stone has permissible production tolerances (ATV DIN 18332 "Natural stone works", VOB Part C, edition 2023-09). For a slab measuring 160 × 61 × 3 cm that means roughly ±2 mm in length, and above 600 mm also ±2 mm in width. That is not arbitrary — it is written into the standard for good reason. If the reasons interest you, look into the accuracy of measuring equipment, the accuracy of cutting machines, the wear on cutting tools, and the influence of temperature during production compared with the installed condition on underfloor heating.
What matters is this: the joint is the place where these tolerances are absorbed. Without joints, or with joints that are too narrow, there is no room left for what material and fabrication inherently bring with them.
The Right Joint Width
For production tolerances to work out cleanly, the executed joint width has to be able to absorb them. In practice this depends heavily on the chosen material, the build-up of the floor system and the shape of the room. There is no single correct joint width here. But in the spirit of the material it is better to make the joint wider than too narrow. If the joint width comes down to the grain size of the joint filler — and yes, that too has a grain size in the end — the pressure is concentrated as a point load between neighbouring slabs. The logical consequence: the chipping mentioned at the start.
Anyone entering the planning stage should know both relevant sets of rules: ATV DIN 18332 "Natural stone works" (VOB Part C, edition 2023-09) and ATV DIN 18352 "Tile and slab works" (VOB Part C, edition 2019-09). They delimit each other by material and building element, and they set the reference values that govern permissible tolerances as well as joint widths and the arrangement of movement joints depending on the size of the stone. In the US market, the ASTM standards take on this role. Going below these reference values means leaving the basis on which tolerances and movement were planned.
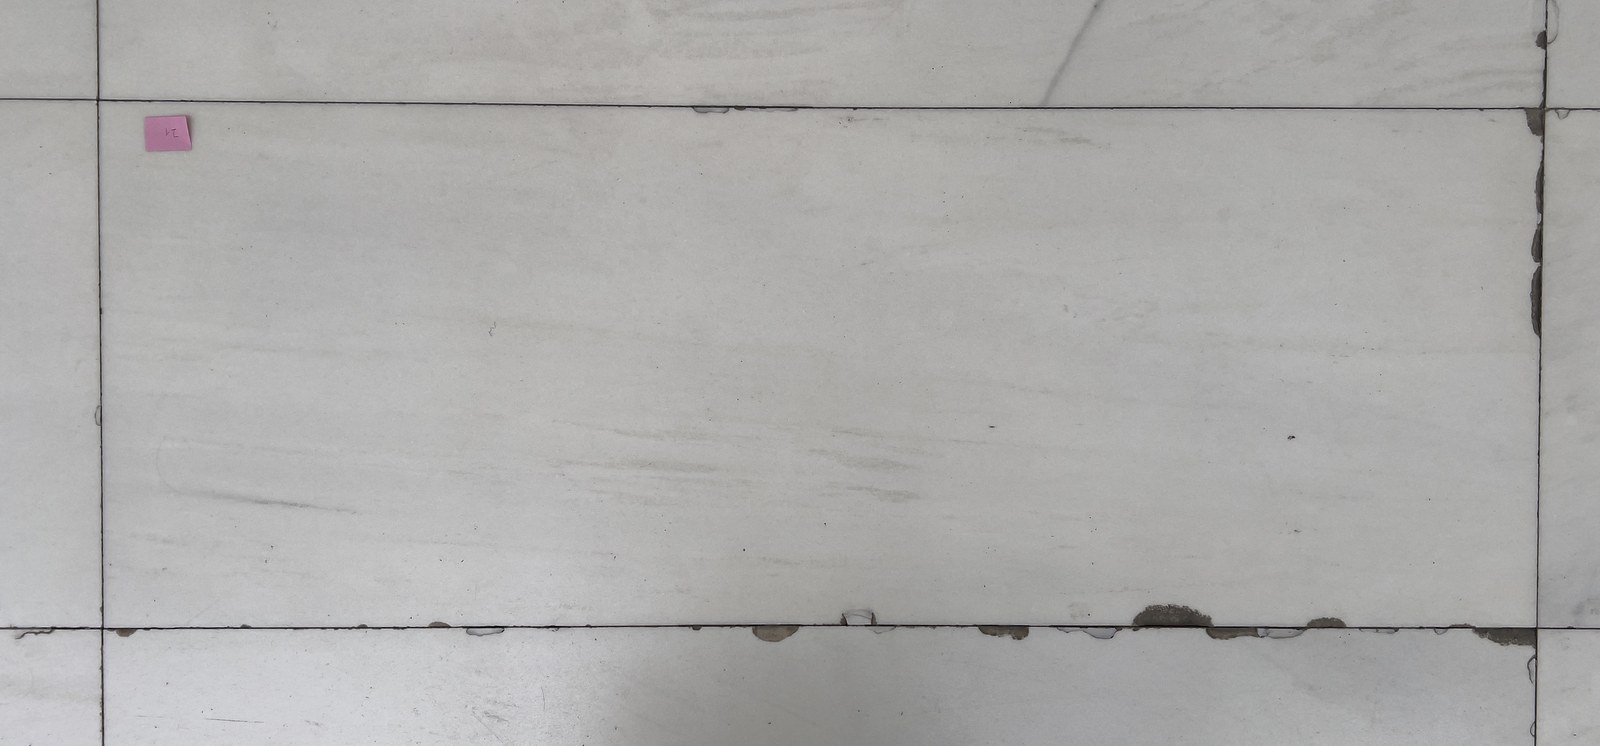
The chipped edges sit exactly at the joints — where joints that were too tight could not absorb the movement of the stone.
Plan Movement Joints, Because the Stone Moves
The second job of the joint is movement. And here a question of millimetres quickly becomes a question of centimetres.
Marble has a coefficient of thermal expansion of roughly 0.0075 mm per metre and kelvin. The calculation is simple: expansion = coefficient × temperature difference × length. With underfloor heating warming the natural stone by 10 K, every metre expands by 0.75 mm. That sounds like very little. Across a field of 8 × 8 metres it already adds up to around 6 mm per axis that has to go somewhere.
That is exactly what movement joints are for — joints that absorb this expansion. Two things are decisive: they have to sit in the right places (at field boundaries, connections, material changes, constrictions caused by columns or floor boxes), and the joint material has to stay compressible — permanently elastic is the term. A movement joint filled with rigid mortar is visually present but has no function.
One trigger is regularly overlooked: the system change in the substrate. Where the build-up beneath the covering changes, or where a building element is enclosed in the screed — a column, for instance — the areas to the left and right of it behave differently. If neither a movement joint is set at that point nor the covering decoupled, the stress travels unchecked into the stone surface. The damage pattern is then characteristic: the cracks do not stay within one slab but run across several slabs and straight over the joints — and in the case of an enclosed column they reach down into the screed.
Decoupling is therefore the second lever alongside the movement joint. It does not absorb the movement; it separates the covering from the movements of the substrate.
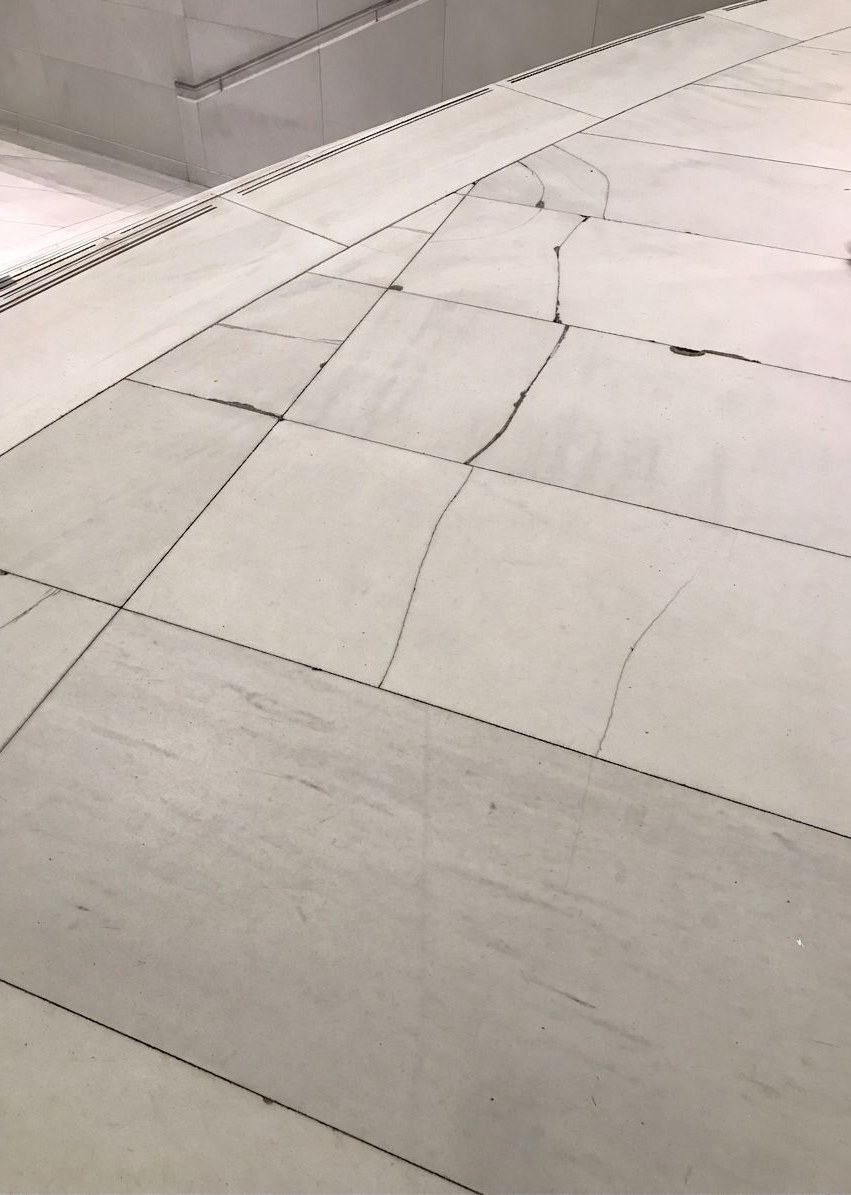
Cracks run across several slabs and straight over the joints. This pattern appears where the substrate system changes and neither decoupling nor a movement joint was executed.
What Happens When the Joint Is Too Tight
This is where the circle closes back to the project at the start.
If the joint is too narrow, in the extreme case the grain size of the joint filler matches the joint width itself. Instead of distributing the load evenly, stress peaks develop. Now add thermal expansion — from underfloor heating, for example — and one stone transfers its movement through the over-tight joint directly onto its neighbour. A three-dimensional stress state builds up inside the stone. In terms of area this is tiny, but the pressures reach megapascals. That pressure overwhelms the binding forces in the grain structure, in the crystalline structures of the stone; the compressive strength is exceeded, and small cracks form. In white natural stone these often become clearly visible very early — frequently as a small dark crack.
As a consequence the material tears. The crack runs towards the surface at a material-dependent angle — and a piece breaks out at the edge. That is chipping. Not botched installation, not bad natural stone: a mechanical chain reaction that begins with a joint that is too tight.
In damage forensics a clear pattern emerges: chipping concentrates where movement joints or stress-heavy corners were not given enough attention — and where underfloor heating is involved. Same installation, same weather, same installer — the only difference is the thermal load. With borderline joints, underfloor heating is one of the main drivers of chipping.
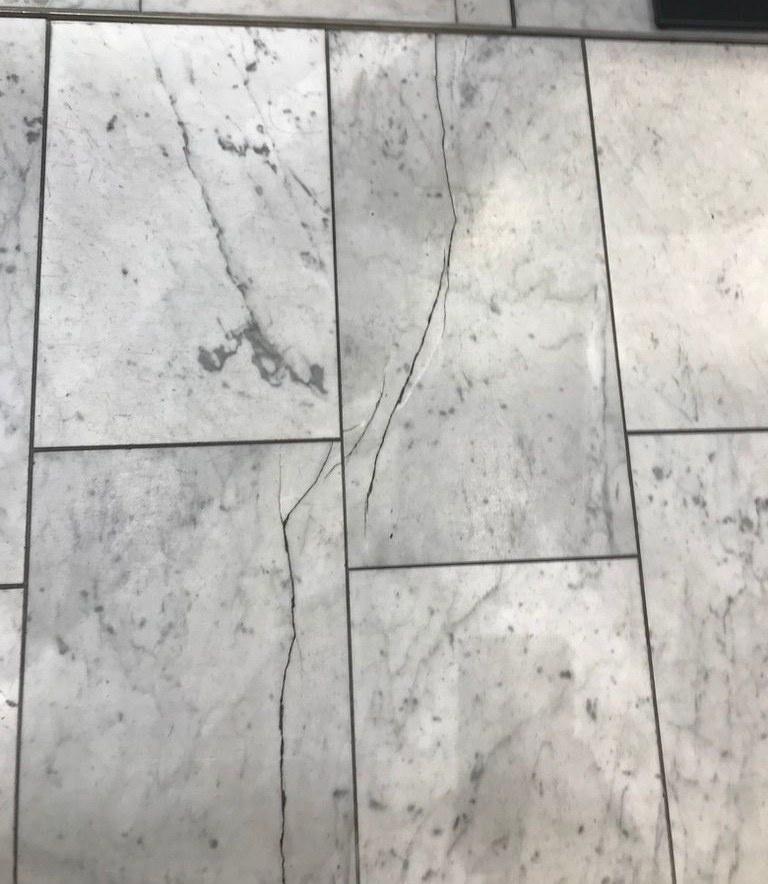
The dark crack runs through the slab and across the joint: the stress comes from a column enclosed in the screed, and the crack continues down into the screed.
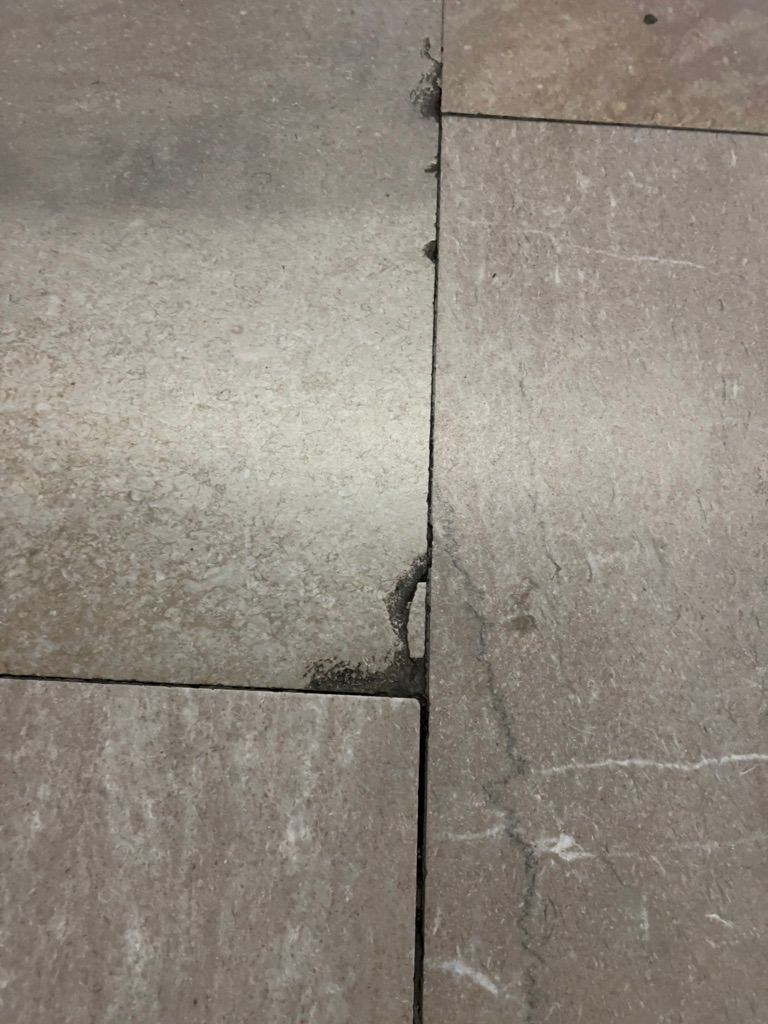
At the joint intersection the edge breaks away in two directions — expansion was blocked on both axes.
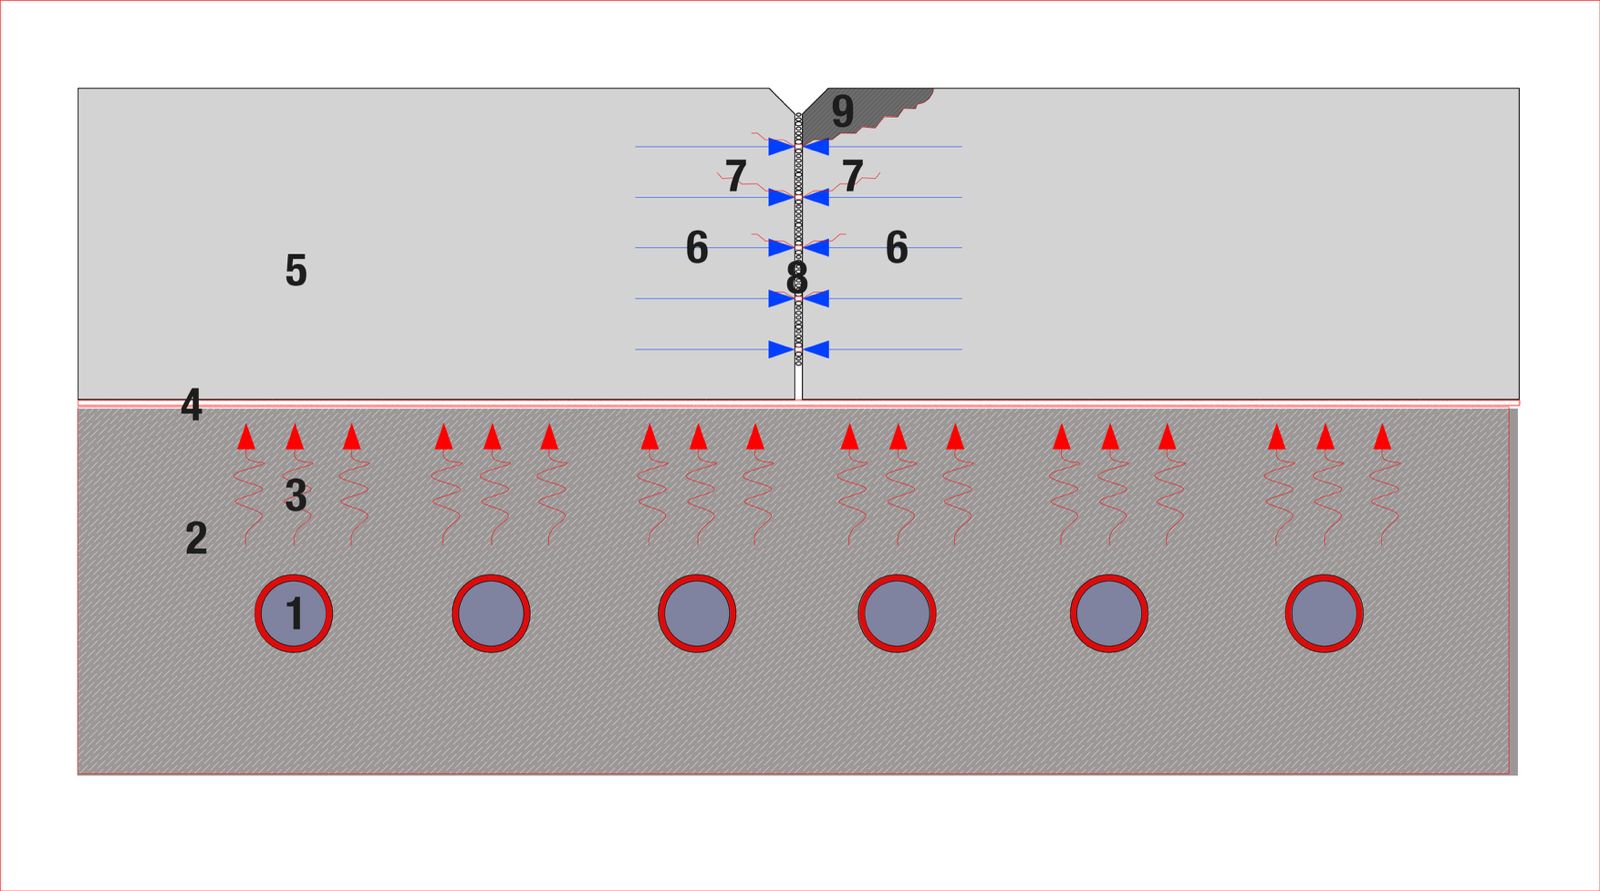
System build-up: how a joint that is too narrow leads to chipping
- Underfloor heating
- Screed
- Rising heat
- Bonding / adhesive layer
- Natural stone slab
- Thermal expansion → pressure on the joint
- Stress peaks / incipient cracks in the stone, following the crystal structure
- Minimal joint with joint filler
- Chipping / spalling at the surface
When Specifications Go Beyond the Standard
In practice the design decision often comes from outside: architects or building planners want tighter joints, larger slab formats or higher accuracy than the industry standard provides for. Understandable from a design point of view — a liability issue from a technical one.
Anyone implementing such specifications should do three things: regulate the deviation from the standard separately in the contract, inform the client in advance (standard versus elevated target, including the consequences), and when in doubt, decline to go below the reference values. Remediation after chipping costs many times more than the joint that was saved beforehand.
With very tight joints and large slabs, it is advisable to re-cut all joints cleanly on site after installation. This prevents the slabs from touching directly as a result of production-related dimensional tolerances. Yes, that means considerable cost and a certain amount of mess on site — but it safeguards the installation work.
The Decision Is Made Before the First Cut
Joint pattern, joint width and the position of movement joints are not decisions for the building site. They belong in the planning — before the first stone is cut. Anyone who plans the surface through in advance can see where the fields lie, where the movement joints have to sit and how the joint pattern interacts with the slab grid. They also see where the joint has to run through the system build-up across trades.
Digital advance planning helps with this task today. In a digital dry layout the surface can be laid out with the real slab grid, the joint pattern can be played through in relation to the structures of the natural stone slabs, and the arrangement of movement joints can be shown before anything is produced. The result is documented and traceable — in the event of damage, also as evidence that the joints were planned according to the standards.
What It Comes Down To
The joint is the most underestimated building element in natural stone. It absorbs production tolerances, it takes up thermal expansion, and it decides whether a floor lasts for decades or breaks away at the edges after months.
The rules for it are known: joint width according to the standard, movement joints in the right places, compressible joint material — and particular caution as soon as underfloor heating is involved. Following them saves the most expensive bill of all: the remediation.